How to manage workflows with the Ipywidgets GUI
This documentation describes the usage of the Graphical User Interface (GUI) to the WFEngine class based on ipywidgets. The GUI makes using all functions in the WFEngine class much easier than using the Python Application Programming Interface (API) directly in a Jupyter notebook. The fairly short notebook needed with one line of code has a lot of power!
Though the GUI is very intuitive and simple it is recommended to consult this glossary to better understand the terms used in the explanations below.
Import the main object and main menu
The only needed Python object is imported with this code:
from virtmat.middleware.engine.wfengine_jupyter import wfengine
With this, the GUI is constructed and the default launchpad configuration file is selected as well. Now the notebook output looks like this:

Currently, the GUI has the following sections: Manage engine, Manage launcher, Manage workflows, and Manage nodes. In the following, these sections will be described in detail.
Manage engine
The engine object is managed in this section that is entered via Manage engine button.
Create a new engine from scratch
The Create a new engine from scratch (radio button) option activates the helps to create a new engine from scratch. First you must select a launchpad file (JSON or YAML format) using the Select or Change buttons (whatever is shown) and then load it using the Load launchpad button. You can find more about the launchpad file in this section. Then select the qadapter file and load them using the Load qadapter button. The qadapter file is only required if your workflow includes nodes that require large computing resources that are supposed to be run using a batch queuing system. For more details about qadapter objects and files we refer to this section. If you intend to create a new engine with workflows already existing on the launchpad, then you should define a workflow query in the input field Query to select workflows. An empty query {} will result in adding all workflows on the launchpad to the engine. For more details on how to define a workflow query (wf_query), please read this section.
NOTE: All queries in the GUI are strings in JSON format instead of Python dictionaries that are used in the Python API.
If you wish to include no workflows at the beginning then specify None in the Query field. With the Launchdir option you can set the path to a directory where to start interactive and batch jobs. This defaults to the launchdir in the resource configuration if it is specified there, otherwise it defaults to the current working directory. If you use an HPC cluster with a batch queuing system then a good choice is to create a workspace and provide its path here. Once all the required options are set, then you click on Create new engine button.


Save or load an existing engine
Alternatively, the radio button option Save or load an existing engine helps saving the current engine to a file or loading an existing engine from a file. This is helpful to use the same engine in different Jupyter sessions. For this purpose, select an WFEngine file by clicking on Select or Change button (whatever is shown) and then click on either the Save engine or Load engine button. The WFEngine file may be either in JSON or YAML format.

Use a remote cluster
If the optional parameter Use a remote cluster is not set (the default), then the launcher thread will execute workflow nodes on the local resources - either interactively where Jupyter is runnnng or in batch mode whereby the nodes are submitted as SLURM jobs. If the Use a remote cluster is set (see the figure below) then the launcher thread will run the nodes for batch execution on a remote cluster. In this Username and Hostname must be specified.
NOTE: An SSH connection to the remote cluster must be established and the SSH key passphrase must be unlocked before the engine is created from scratch or loaded from file if you use a remote cluster.
The optional parameter Command can be used to specify a configuration command to set the job runtime environment on the remote cluster. For example, environment modules can loaded and a specific Python virtual environment can be activated.

Manage launcher
The launcher is a thread running in the background that executes the workflows added to the engine node-by-node. The Manage launcher sub-menue provides two functions: Start Launcher to spawn a background launcher thread and a Stop launcher to safely stop the thread.


Manage workflows
In the sub-menue Manage workflows one can add, remove and monitor the workflows in the engine.
Monitor the workflows
Click on Status button to get an overview of all workflows in the engine with their corresponding properties. A summary of all the nodes in every workflow is displayed.

Add workflows to the engine
To add workflows from a file to the engine, click on Add workflows button. You will get two different methods to select workflows.
Add workflows from the launchpad using PyMongo queries in JSON format for workflows collection and nodes collection each.

Add workflows from a file by using the file selector widget (
SelectorChange, whatever is shown) to find a workflow file in YAML or JSON format, and then clicking on theAddbutton. If workflows from several files should be added then use theChangebutton to select further paths and then click on theAddbutton again.

Remove workflows from the engine
To remove workflows from the engine first one must find the relevant node IDs by using the Status button, then press the Remove workflows button, select these IDs from the Workflow IDs select box and finally click on the Remove button. This removes the selected workflows from the engine.

NOTE: Removing workflows from the engine does not remove them from the launchpad. This means that later one can add the same workflows again to an engine using a query.
Manage nodes
In the sub-menue Manage nodes individual workflow nodes can be monitored and managed.
The status buttons
The first Status button provides an overview of all nodes in the engine and it has the same function as the Status button in the Manage workflows section (see above).

To get detailed information about particular nodes, select the node IDs in the input field Node IDs and click on the second Status button:

Rerun nodes
Sometimes it is necessary to rerun some nodes, in particular after a job crash or due to updates. This can be done with the button Rerun nodes after selecting the relevant node IDs in the Node IDs selector. Only nodes in COMPLETED, FIZZLED and RESERVED state can be rerun. The current state and the node IDs of the nodes can be found using the Status button (see above).

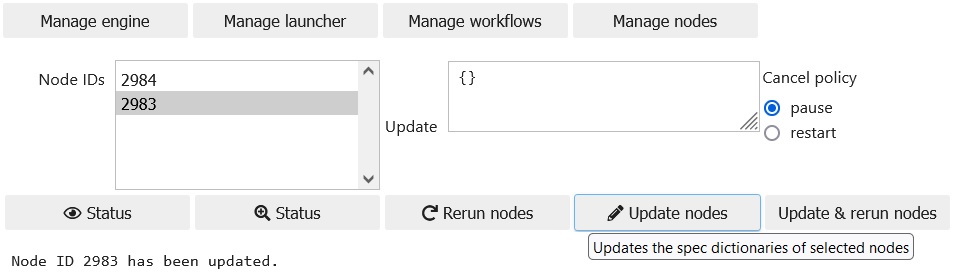
Update nodes
The spec dictionary of a node can be modified (updated) if the node is in WAITING, READY and FIZZLED states. The update is a pymongo query in JSON format that has to be specified in the Update text input area. Then the relevat node IDs have to be selected in the Node IDs selector. Eventually, one has to click on the Update nodes button.
Update and rerun nodes
To update and rerun a node in COMPLETED state (for example, due to a mistake found in the inputs that has to be corrected) the Update & rerun nodes button should be used. This button performs effectively the same actions as the combination of the Rerun nodes and Update nodes buttons. However, it is not recommended to use Rerun nodes and then Update nodes in a sequence because the node may be launched before the update has been made. On the other hand, updating COMPLETED nodes as first in the sequence is not possible.
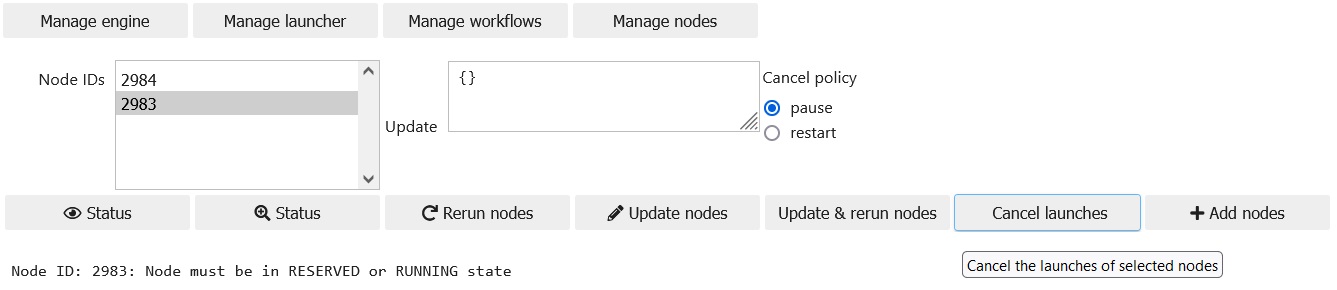
Cancel launches
The active launches of nodes in RESERVED and in RUNNING states can be cancelled using the Cancel launches button after selecting the relevant node IDs from the Node IDs selector. The cancellation policy can be switched between pause and restart using the radio button. If pause is selected then the node will be paused (state PAUSED or DEFUSED) after cancelling the launch. If restart is selected then the node will be in READY state.
Add nodes
Workflows in the engine can be extended by adding new nodes to them. Currently the new nodes can execute a Python function for a list of inputs (passed to the function as list arguments) and return a tuple of outputs. The inputs and the outputs are given some names under which these data are available in other nodes of the workflow.

The function name should be a fully qualified name of a function, i.e. together with the package, module etc. in that it can be found in $PYTHONPATH, for example math.exp: exp() function from the math package.
The input and output names may be any strings in the utf-8 encoding.
The input values are provided in JSON format if no node in a workflow in the engine provides these inputs. If a node provides the input then the node ID has to be selected from the Node IDs selector and the input value must be left null.
The number of inputs and outputs can be changed using the # Inputs and # Output widgets.
Finally, the job category can be selected using the radio button Job category. Nodes of the default interactive category are launched one by one directly by the launcher thread running in background in the Jupyter notebook with the engine. Nodes of the batch category are submitted one by one to the SLURM queuing system (launched in reservation mode). Nodes of the remote category are submitted to the SLURM queuing system on a remote machine other than the one running the Jupyter notebook.
NOTE: Not implemented features that are currently available in the API only: qadapter, fworker, kwargs passed to the python function